CLIENT/PATIENT REGISTRATION - PATIENT DEMOGRAPHY MANUAL
Introduction
For Medical Record department, Front desk, Front Office, Client Services.
VideoCLIENT/PATIENT REGISTRATION, DEMOGRAPHY

Patient Registration is a process by which a patient's name and identity are enrolled into the records of the healthcare facility. It is required in order to provide care to the patient and to keep a track record of various services that are available to each patient. It is the beginning of generating a medical record of the patient in which all medical details of the patient are documented. Registration is generally handled by the Medical Record department, front desk, and Client Service center.
Below are the objectives of Patient Registration:
• To collect basic details related to demography, identity, contacts and others;
• To capture a patient’s name into the facility's system;
• To create a unique identification number for each patient;
• To generate a record of the patient for documenting further processes.
The facility must ensure that the registration process is carried out smoothly and its objectives are met. The facility must have a well-defined and documented policy and procedure for carrying out registration.
All first time patients who want to access the services of the facilty must be registered. This includes patients who come to the OPD or Emergency or are transferred from another facilty.
Registration must NOT be done in the following situations:
• If the patient is already registered with the hospital and the registration details are available;
• If the patient unknown to the hospital is brought in dead. In this case, the brought-in-dead policy must be followed;
• If the healthcare service required by the patient is not available in the hospital.
When should registration be done?
• Registration should be the first step before any healthcare service is provided.
• In an emergency situation where care needs to be provided urgently, registration can be done simultaneously or later as per the situation.
NOTE: Emergency cases should be handled in the facility's emergency department/unit and its urgency should be determined based on the Triage process.
How should the registration be done?
Option One: Direct online entry by Staff
Staff may do direct entry into the BH system by asking politely the client/patient or relative the related information
Option 2: Filling Registration Form
• Patients should be asked to fill the registration form, in which basic details are required. Assistance will be given to needy patients in filling the registration form
• The form should be signed by the patient (or thumb impression taken.
• The details from the registration form should be entered into the facility's Bengel BH system. Once the information is saved, the BH system will generate a Patient Identification number(PID).
• The PID number along with the name, address and date of birth of patient should then be printed out, signed and handed over to the patient. Or an SMS should be sent to the Patient.
• The patient should be billed/charged an applicable registration fee. In the case of a Cash patient, the fee must be paid by patient and a receipt must be issued.
• In the case of a minor patient, the parent/guardian of the patient must sign on the registration form.
Some Information to be collected at the time of registration.
• Name, Date of Birth, Gender, Contact/phone number, Address, Email address:
• Name of guardian (in case the patient is a minor), and relationship with the patient;
• Health Insurance details (If applicable);
• Referring doctor’s name (if applicable);
• Who to contact during an emergency:
o Name of person;
o Relationship with patient;
o Contact/phone number.
Confidentiality of information
The information collected at the time of registration is private information of the patient and must be kept confidential. This is an important part of fulfilling patients' rights.
The information should only be used for the purpose of providing healthcare services
The access of the patients’ information will only be given to specific departments and staff. This data should not be revealed to anyone outside of the hospital
In certain circumstances, such as legal authorities requesting for information, the facility head (or a designated authority) should take the decision.
How do I access the Patient Registration interface?
• Log in to Bengel HMS
• Click on the Medical Records option from the navigation menu on the left of the screen
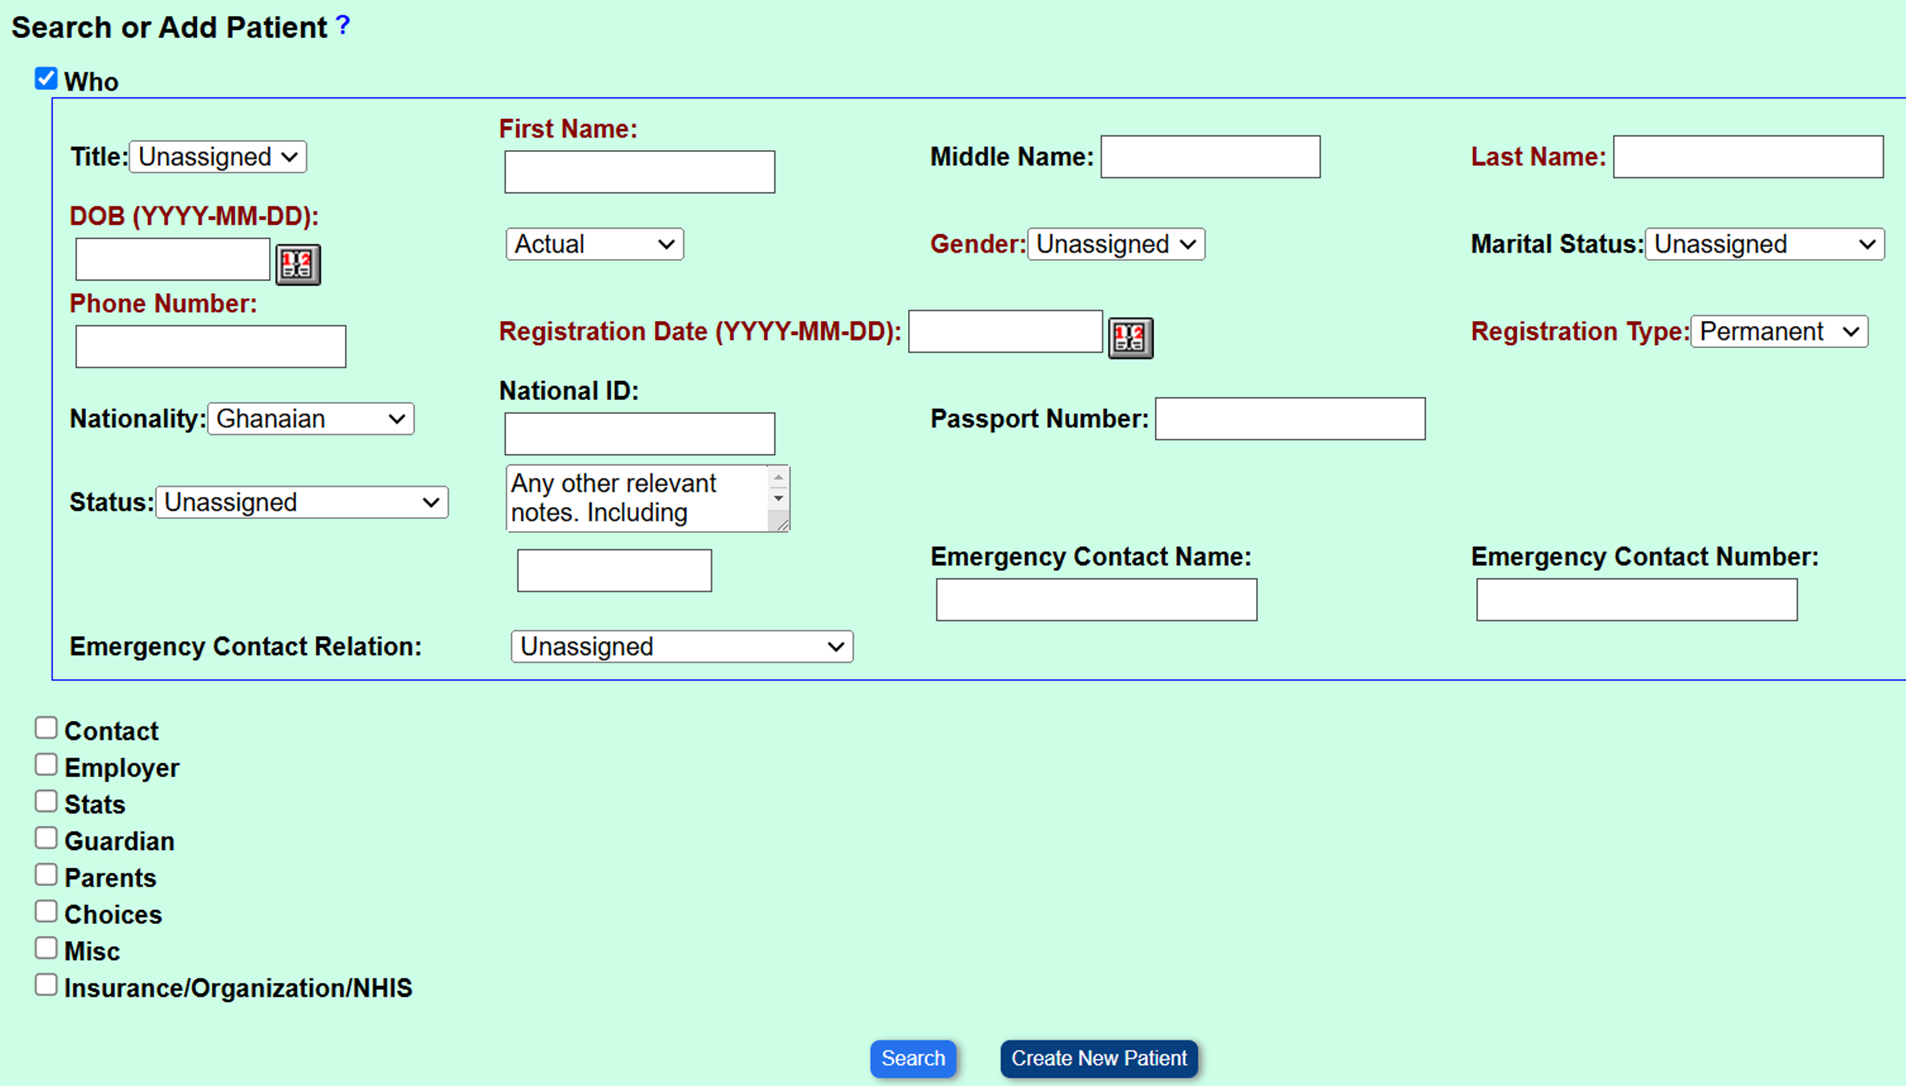
• Click on New/Search from the drop down and begin entering the required details of a new client/patient into the system
NOTE: The New/Search interface has categories of check boxes with related contents for recording different categories of information
• The Patient Registration interface has checkboxes with titles for different categories of data entries
• Each checkbox drops down to display entry fields
• The Who and Insurance/Organization/NHIS are the two common groups that entries are made
• Other checkboxes are Contact, Employer, Stats, Guardian, Choices and Misc
• Each entry field has a label that describes the field
• Some fields are mandatory while others are optional. Mandatory fields are displayed in red color. Name, Date of Birth, Sex, Registration Date and Contact are mandatory. Entries need to be made for all mandatory fields
• Placing your cursor on the entry field displays a comment on that field
• To enter data, type directly into the field/
• A Search Button can be found at the bottom of the interface and is used for searching if a client already exists in the patient list. If your search proves that client exists, do not add him/her as a new patient
• Create New Patient Button: is for saving your entries
• NOTE: On top of the interface is a Help link to a manual and/or video about the interface
How do I assign a Patient to Corporate organization, Insurance organization or NHIS?
• It applies to Clients/Patients whose medical bill will be paid by an organization
That is, it applies to Clients/Patients who are sponsored by Corporate Organizations, an Insurance Companies or NHIS
It does not apply to Patients who will pay for their bills
• You can assign a Patient to an organization during the process of registering the pateint
• Or you can assign an organization by selecting an exiting patient, edit the Demography, and assign an organiztion to the selected patient
• A patient can be assigned to three organizations. Example, NHIS, Private Insurance Company and/or Corporate Organization
• This function is at the Insurance/Organization/NHIS tick box drop down, below the Demographics tabs. Select/Tick the box to drop down the related fields
• The interface displays three (3) boxes, Primary Organization/Insurance Provider, Secondary Organization/Insurance Provider and Tertiary Organization/Insurance Provider
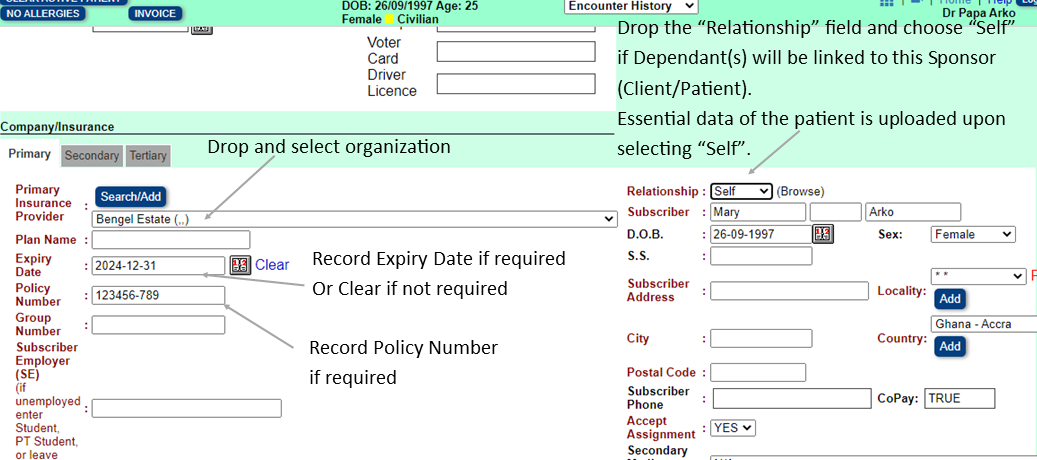
• To assign one or the first organization, drop the Primary Organization/Insurance Provider, and select the organization
o Enter Claim Policy available;
o Enter Expiry Date available;
o Enter the organization's Policy Number available;
o You may enter other required data
o This process may be repeated for Secondary Organization/Insurance Provider and Tertiary Organization/Insurance provider
If the desired organization is not yet available in the dropdown, contact the Facility Administrator to update the list
• When you are done, click Save at the top of the page to save and return to the Demographics summary. The entrie are made visible on the summary page
How do I link a Dependant to a Sponsor?
Linking a Dependant (family member(s) or Ward) of a staff of an organization to the Sponsor (Staff)
It applies to Clients/Patients who are sponsored by a Corporate Organizations. It often applies to Patients' whose medical bill and the dependant medical bill will be paid by Corporate Organiztion.
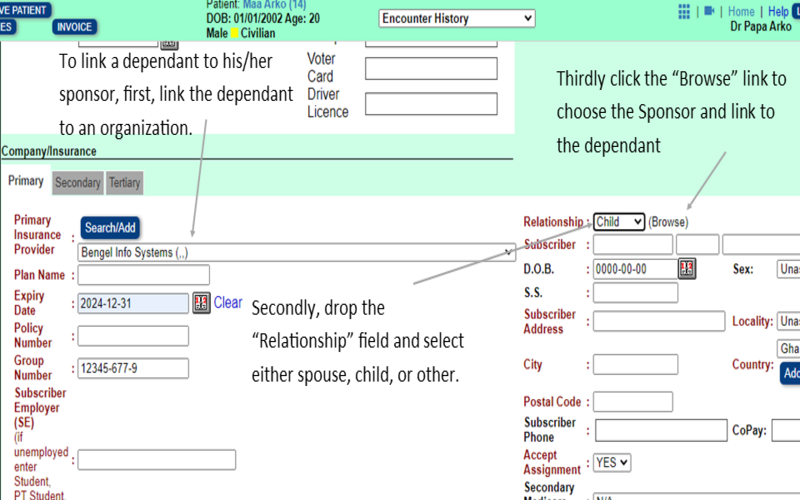
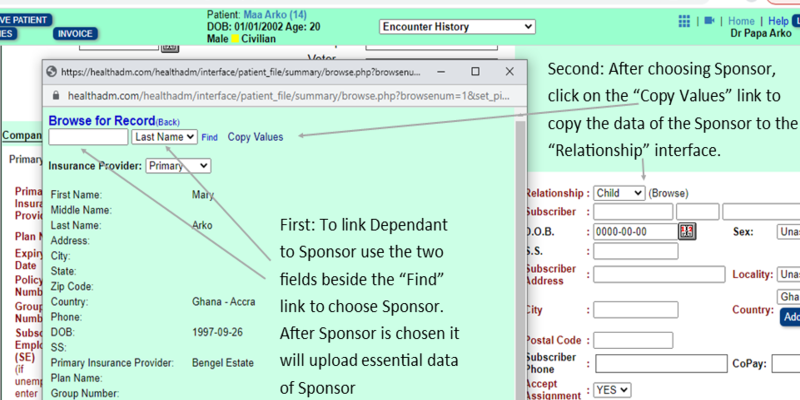
• First, both Sponsor and Dependant should be Registered and assigned to the same organization
• Secondly, select the Sponsor. At the Insurance/Organization/NHIS interface assign, Self at the Relationship field
• Thirdly, select the Dependant. At Insurance/Organization/NHIS interface assign either Spouse, Child or Others at the Relationship field. Click Browse and select the Sponsor and save
• When you are done, click 'Save' at the top of the page to save and return to the Demographics summary. The entries are made visible on the summary page.
• The Create New Patient Button at the bottom of the interface is for saving your data
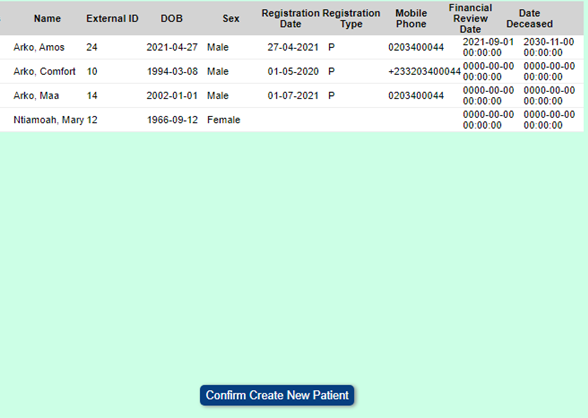
• When you click on the Create New Patient, the Confirm Create New Patient interface displays
• Confirm Create New Patient button: The interface will list a number of existing Patients whose information are similar to the information of the new patient. This is to prevent double/multiple registration of patient.
• At this point you can save your entries and continue your other entries later. You can do so by clicking 'Create New Patient'. This feature is to aid in handling emergency cases.
• Or you can continue your entries to the Choices Tab and then click a Create New Patient
•If the new patient does not exist in the list options then click on Confirm Create New Patient to store the information.
Cancel: Clicking on Cancel will exit the page and will not save data entered. It is recommended you save your data intermittently so you do not loose your data.
• After saving the Demographics you will be presented with the Patient Data Summary Page
• The Patient Summary Page has a series of drop down tabs containing various types of patient data. The first of these buttons is the Demographics
• Other buttons are the insurance and provider information, “Issues” associated with that patient, and Appointments
• Click on the button and expanded to display the related data. You may also click on the expanded button and it will collapse
• On top of the page are tabs for Patient Medical History, Documents, etc.
Registering an unidentified patient
• In a situation where an unidentified patient is brought to the hospital (such as an unconscious patient brought by strangers), an incomplete registration should be done by entering the first name as a Serial Number and last name as ‘Unidentified’. Example, first unidentified patient will be entered as '1 Undentified' with the first name being '1' and last name being ‘Unidentified’ and so on
• A PID number will still be generated for that patient and services can be provided
• The incomplete registration must be completed as soon as identification details of the patient become available
Note: PID number can be used for retrieving the details of the patient in any department of the hospital. However, if the patient has forgotten his/her PID number, the it can be retrieved from the HIS, by entering other details of the patient such as name, date of birth, contact number etc.
For help/information on retrieving Patients' details, visit Help - Retrieving Patient
How to Register Walkin Client/Patient for Diagnosis Imaging/ Radiology
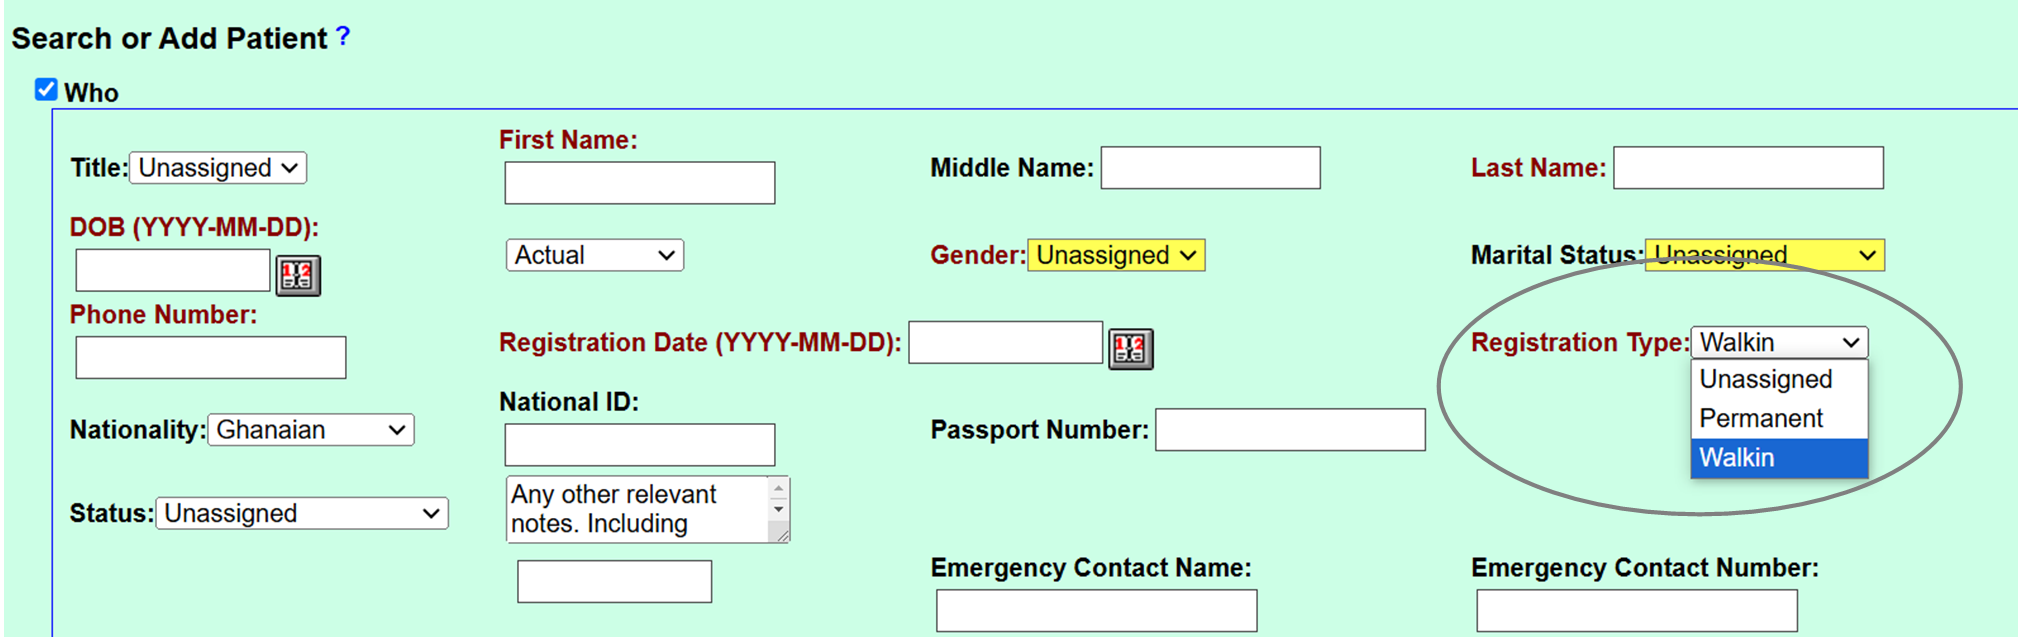
• Walkin Patient for Imaging/ Radiology should be registered like a normal registration. The "Registration Type" should be Walkin
• For accurate diagnosis and investigation and reporting the Radiologist needs the Name, Age/Date of birth and Gender.
• For historical purposes, statistics and reporting.
• Note: Management has to handle the Registration Fee for such Walkin.
How to Register Walkin Client/Patient for Laboratory Investigation
• Walkin Patient for Laboratory investigation should be registered like a normal registration. The "Registration Type" should be Walkin
• For accurate investigation and reporting the Laboratory Scientist needs the Name, Age/Date of birth and Gender.
• For historical purposes, statistics and reporting.
• Note: Management has to handle the Registration Fee for such Walkin.
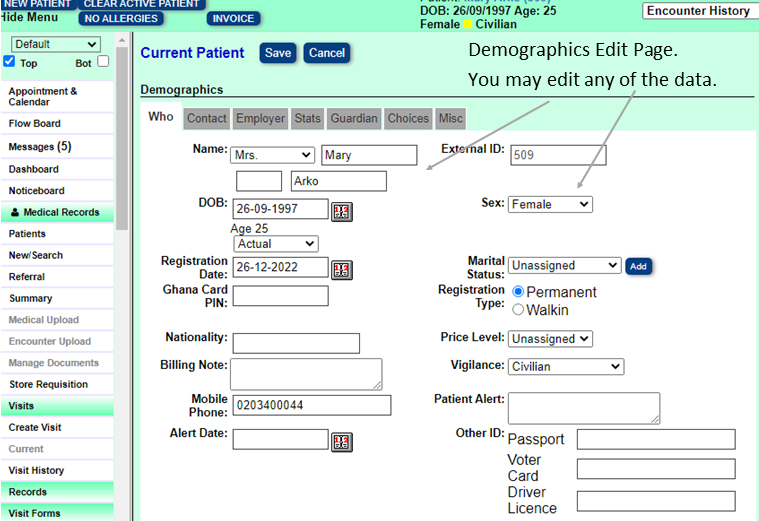
How do I Edit Existing Patient Demography
• Log in to BH, if you are not in the system. And retreive the Patient.
• If you are in the system retreive the Patient.
• After retreiving, you will be presented with the Patient Summary Page.
• To edit/amend or add on patient demographics click the 'Edit' button beside Demographics link and you will presented with the Edit page
• You may be able to edit any of the data.
Additional Info
None.
None
Images
Patient Registration Page
Link to Sponsor page
Link to Dependant
Link to Dependant
Registration Confirmation Page
Summary page

Edit page